

Sszorak
Assignments
 Mutilate(opens Wowhead in a new tab)Mutilate Soaks
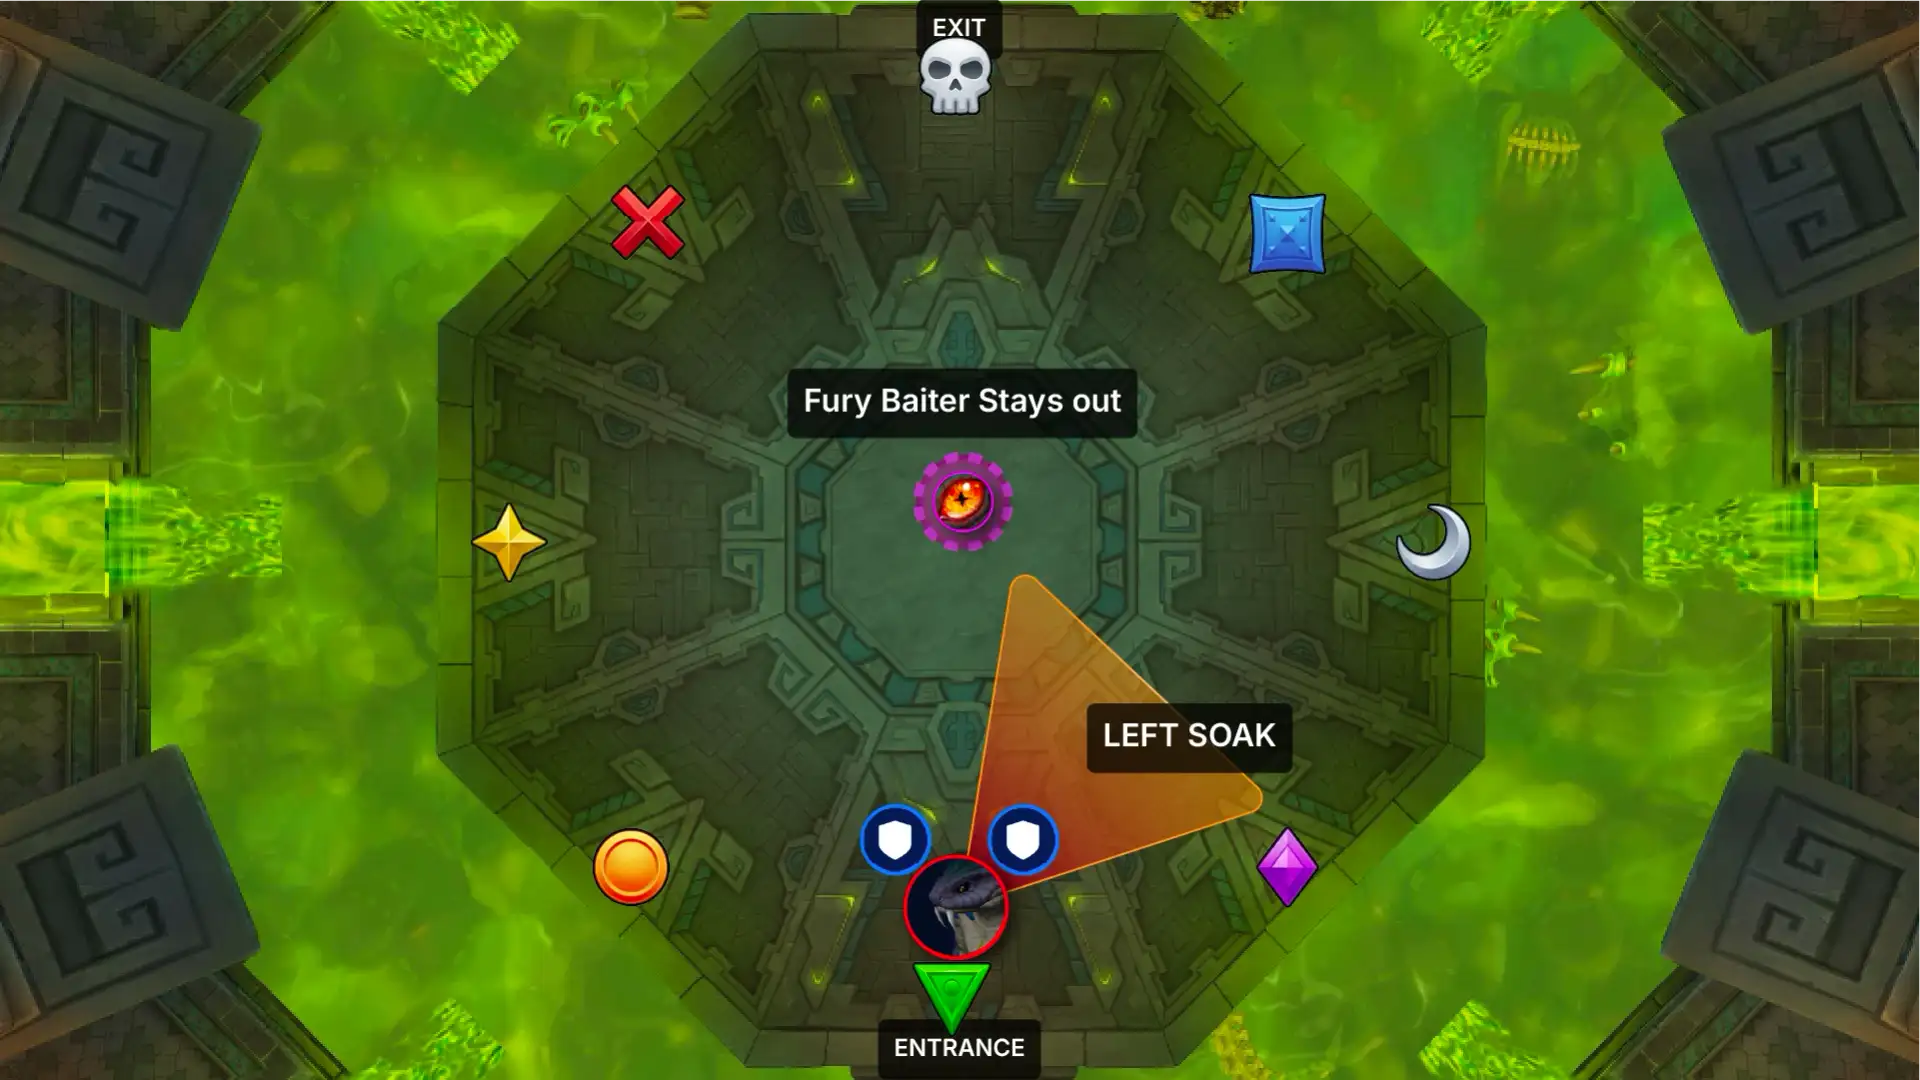
You will be assigned to soak either left or right during the Mutilate casts.
We always face the edge of the platform, so left and right never change.
Tanks are not assigned, since they are the ones aiming it.
Left Group
Right Group
 Serpent's Fury(opens Wowhead in a new tab)Serpent's Fury (Mythic)
The Mythic-only mechanic.
One player stands away from the raid and must not group up with anyone until we're ready to trigger it.
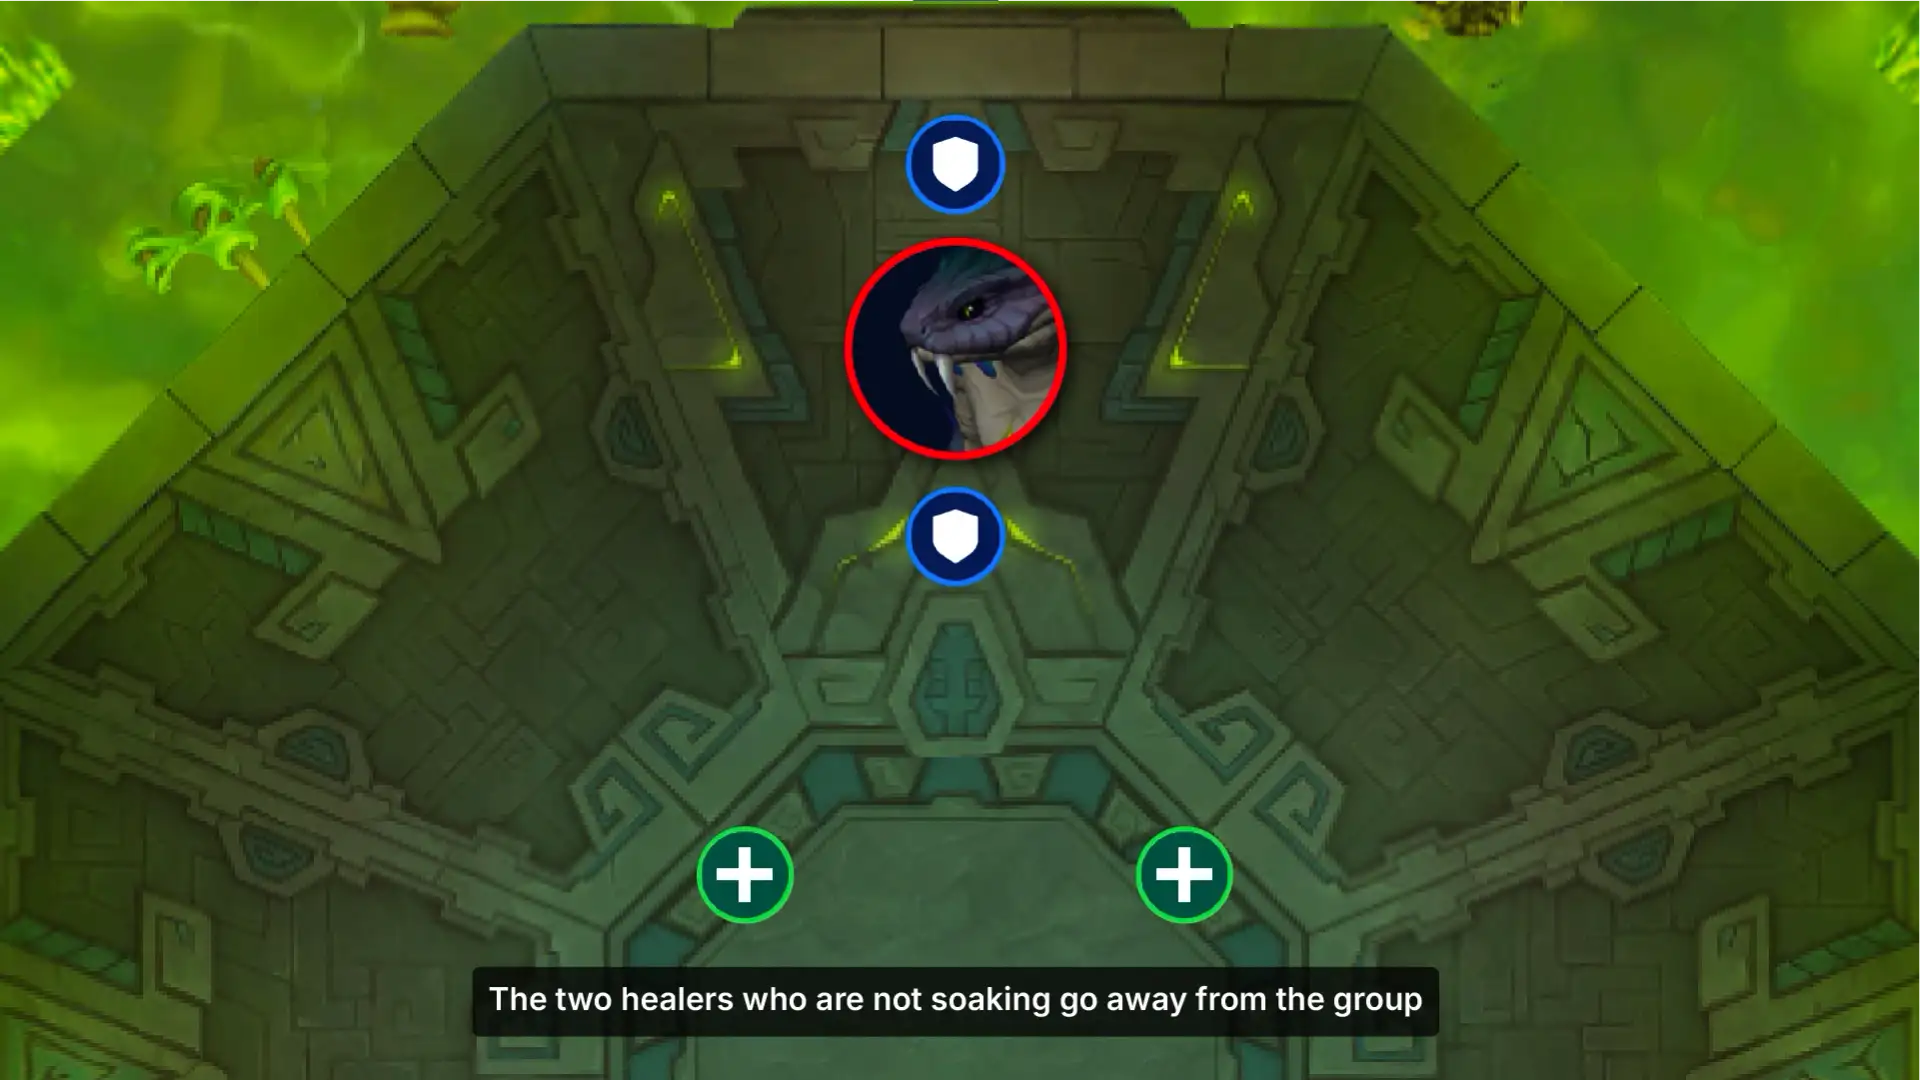
When called, everyone except 2 healers stacks together to trigger it, tanks included.
Once it triggers, everyone gets a spread debuff. Move straight to your numbered spot on the map.
The lines don't reach across the whole room. They're only as long as the animation shows, give or take a yard or two.
Spread Positions
 Raging Crosswinds(opens Wowhead in a new tab)Raging Crosswinds
We skip this mechanic with movement abilities: teleports, Disengage, Blink, Alter Time, Dracthyr jumps.
Paladins and Priests have to play it properly, unless they are a Dracthyr (sorry Paladins).
For Paladins and Priests only.
Stand still and press your macro so other people can find you and line up.
If you are lining up with them, you can't cancel your winds: you have to hit them.
/ping [@player] On my way
/say {square} 1 {square}
Other Assignments
 Venomous Surge(opens Wowhead in a new tab)Orb Popper
You pop the orbs for us during the intermission.
Serpent's Fury(opens Wowhead in a new tab)Serpent's Fury Baiter
You stand away from the raid and bait Serpent's Fury until we call the stack.
Mutilate Soaks 1
Mutilate(opens Wowhead in a new tab)Orientation
We always face the edge of the platform.
That holds wherever we are on the platform, so left and right never change.
Soak Order
The order doesn't matter.
Stay with your group and the tanks will aim it at you.
Serpent's Fury(opens Wowhead in a new tab)Fury Baiter Stays Out
The baiter stays away from the raid and doesn't group up with anyone until we call the stack.
Loading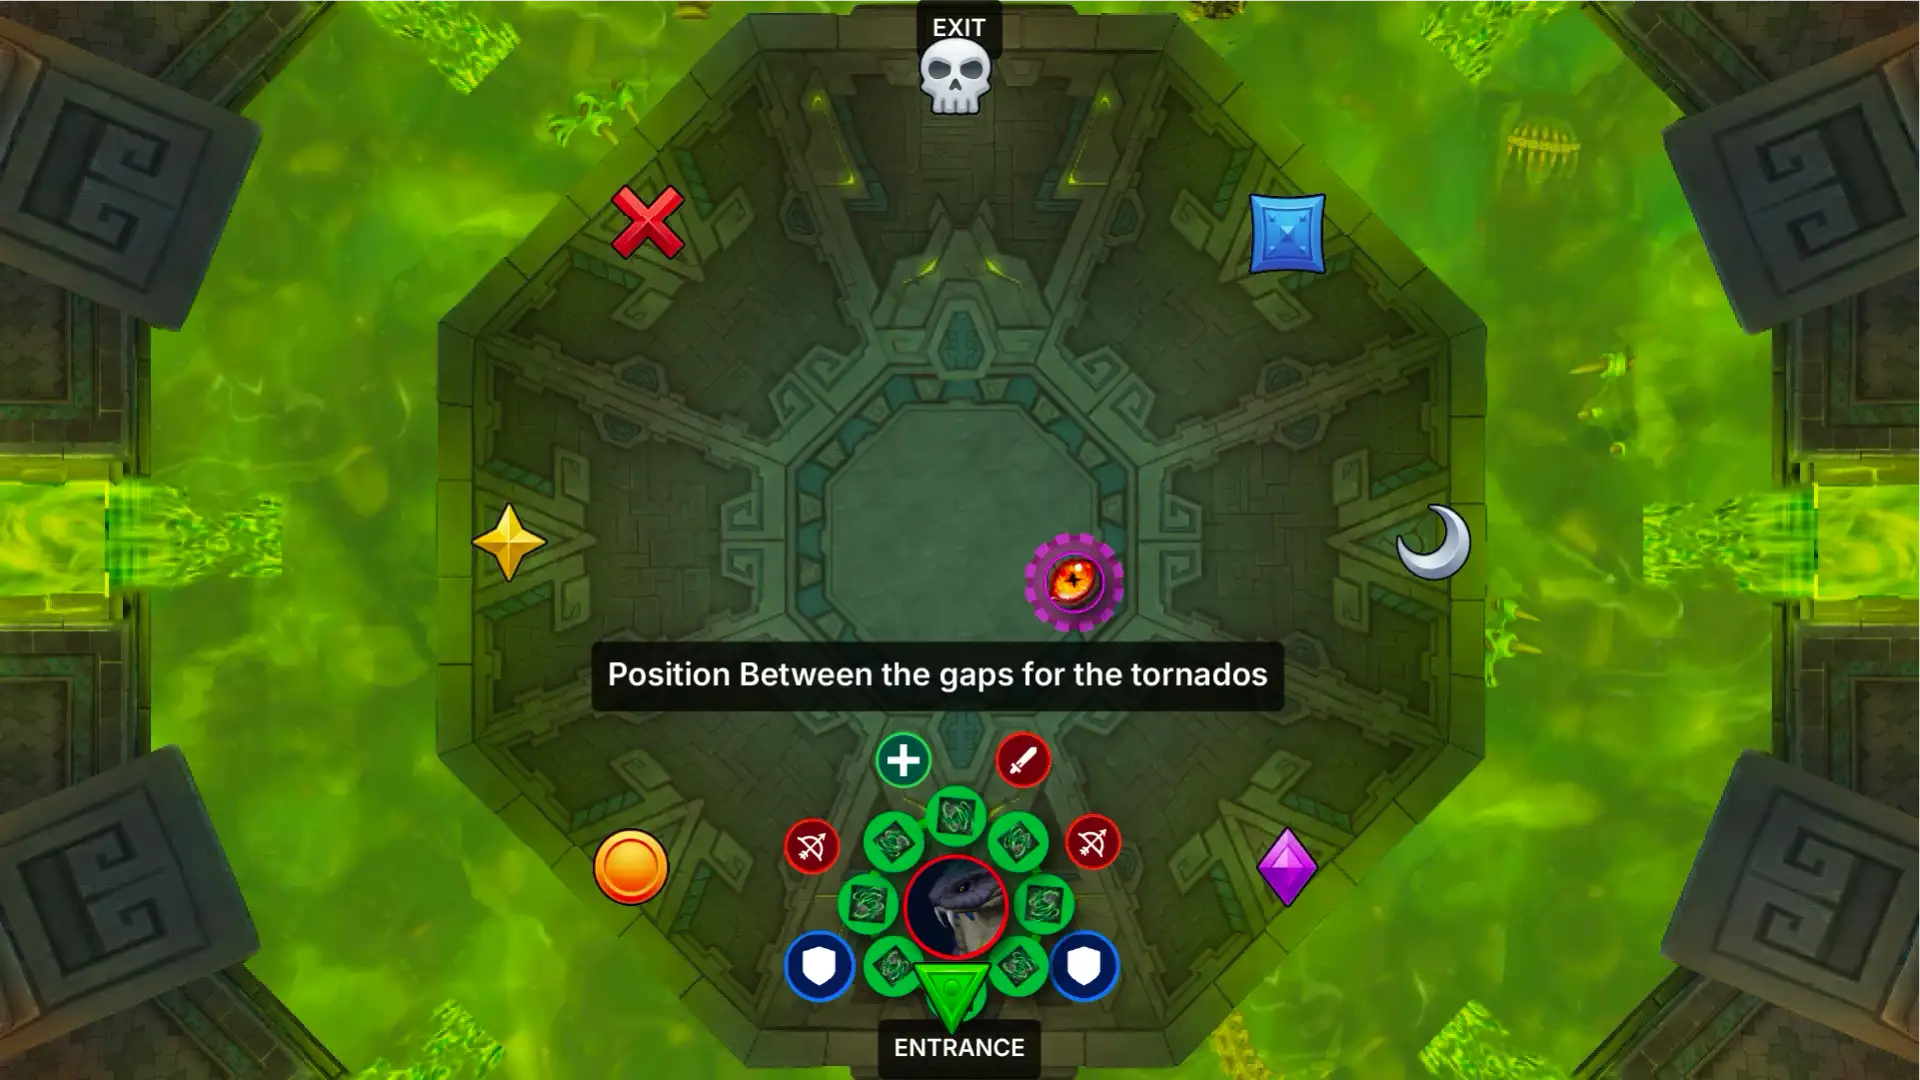
Tempest 1
 Tempest(opens Wowhead in a new tab)Tornados
The tornados spawn from the boss and travel outwards, like the glaives on Lura.
Position between the gaps so they pass you by.
On Mythic, getting hit by one will very likely kill you. This is personal responsibility.
Mutilate(opens Wowhead in a new tab)Mutilate
The next Mutilate follows shortly after (timings may change).
Be in your group, ready to soak.
Serpent's Fury 1
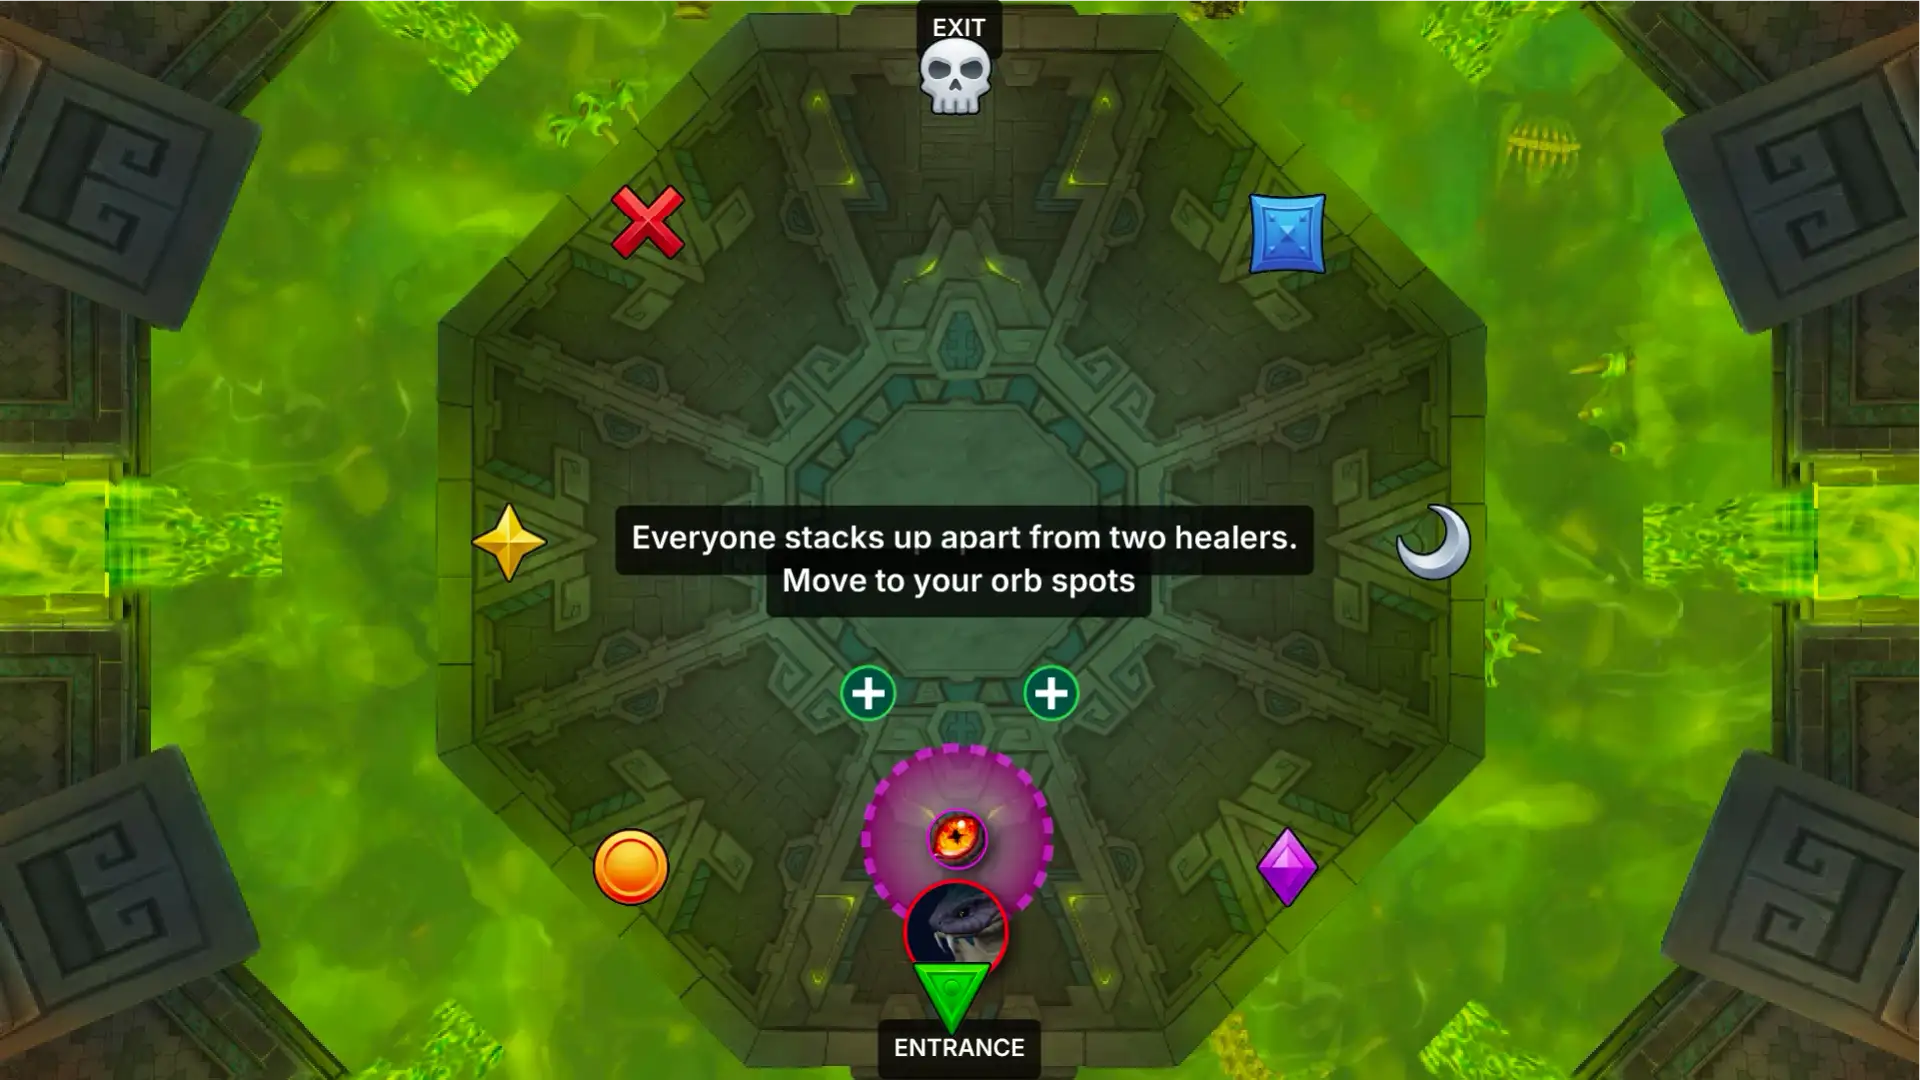
Serpent's Fury(opens Wowhead in a new tab)Stack Up
After the soaks, stack up under the boss ready to break the Fury.
Who Doesn't Soak?
Only the two healers. They step away from the group.
Everyone else soaks, including the tanks.
Spread Out
Lines come out of you in either the cardinal directions (N, E, S, W) or the intercardinals (NE, SE, SW, NW).
Check which set you have and adjust so your lines don't hit anyone.
If your line hits someone, it spreads to them and they have to play it again. If that happens, just give them space.
Orb Spots
Then move to your orb spots, ready for Venomous Surge.
Venomous Surge 1
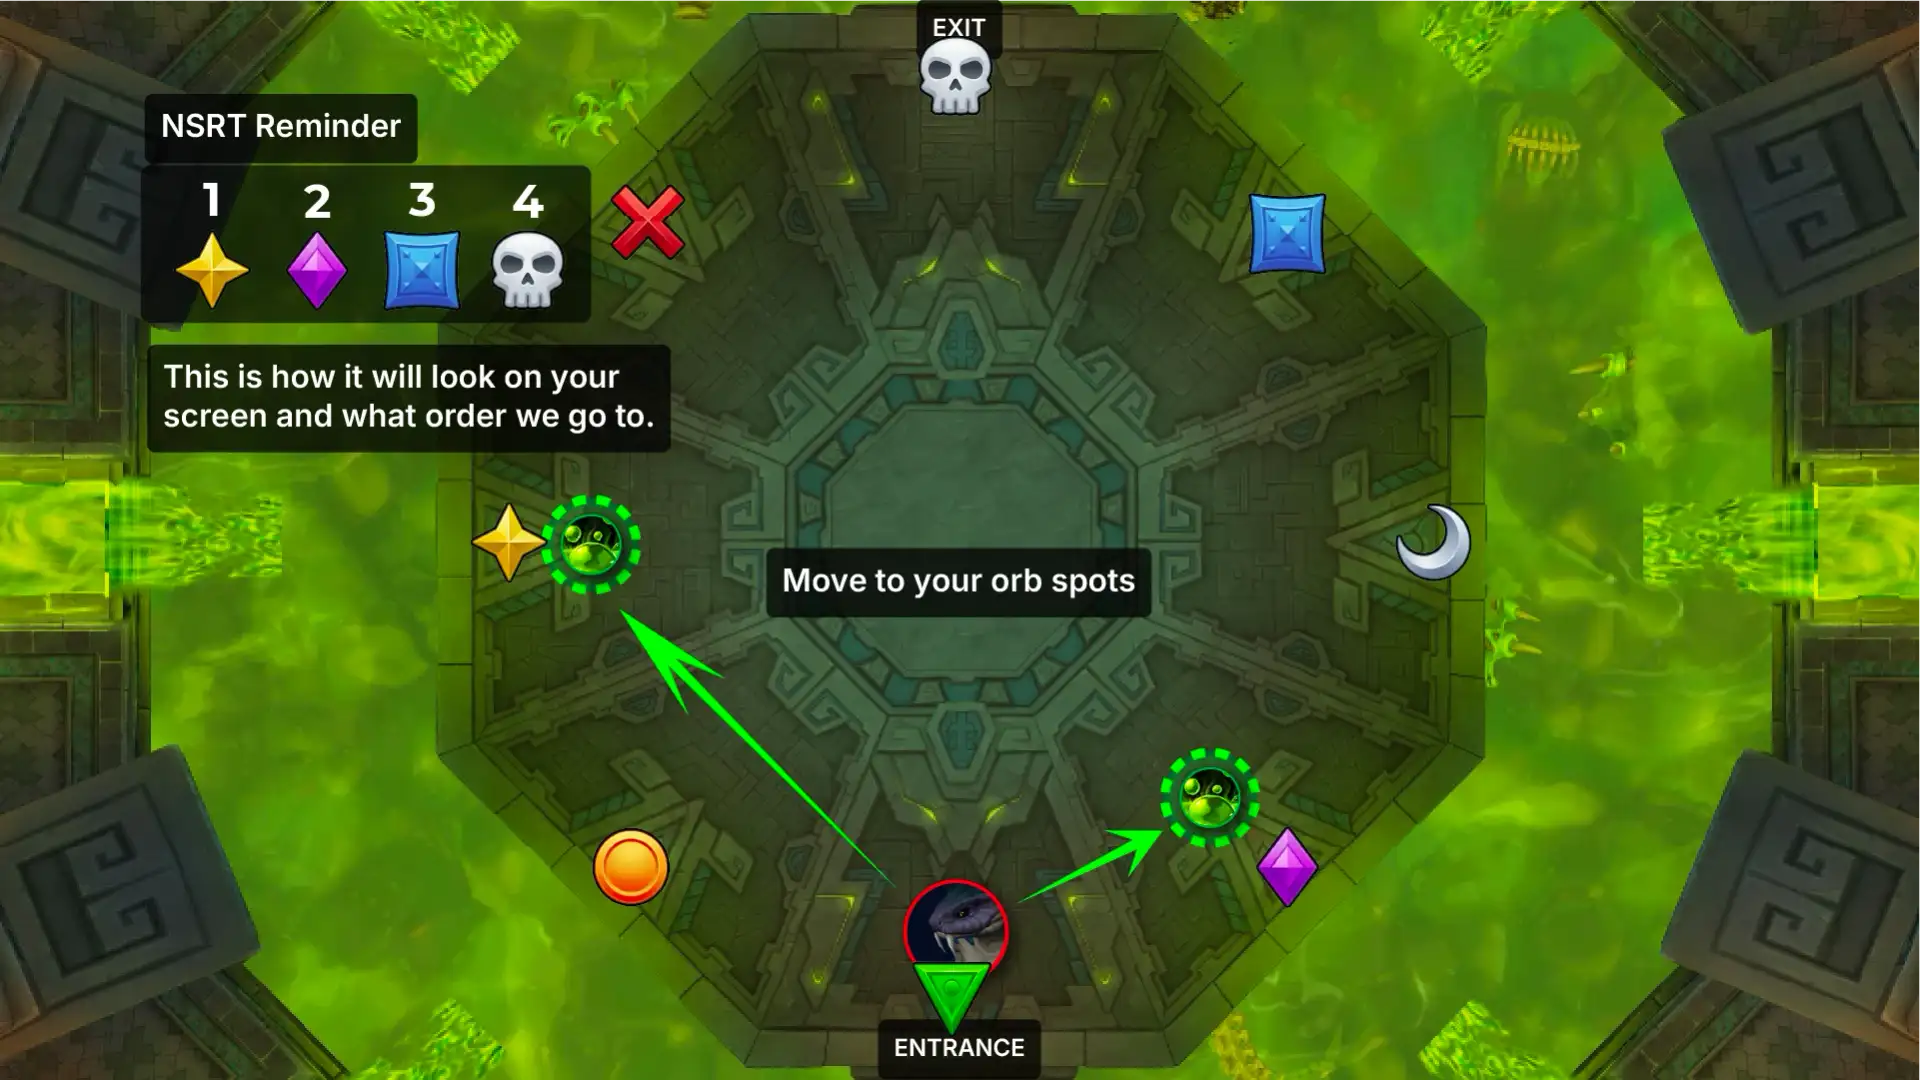
NSRT Reminder
Make sure you have both the map and the bars turned on.
The map shows the drop order. The bars show which orb is yours and the marker to take it to.
Venomous Surge(opens Wowhead in a new tab)Drop Order
1  Star, 2
 Diamond, 3
 Square, 4
 Skull.
This set takes the first two.
Where to Drop?
Close to the edge and in line with the centre.
Avoid dropping it off to the sides.
Raging Crosswinds 1
Raging Crosswinds(opens Wowhead in a new tab)Mythic Change
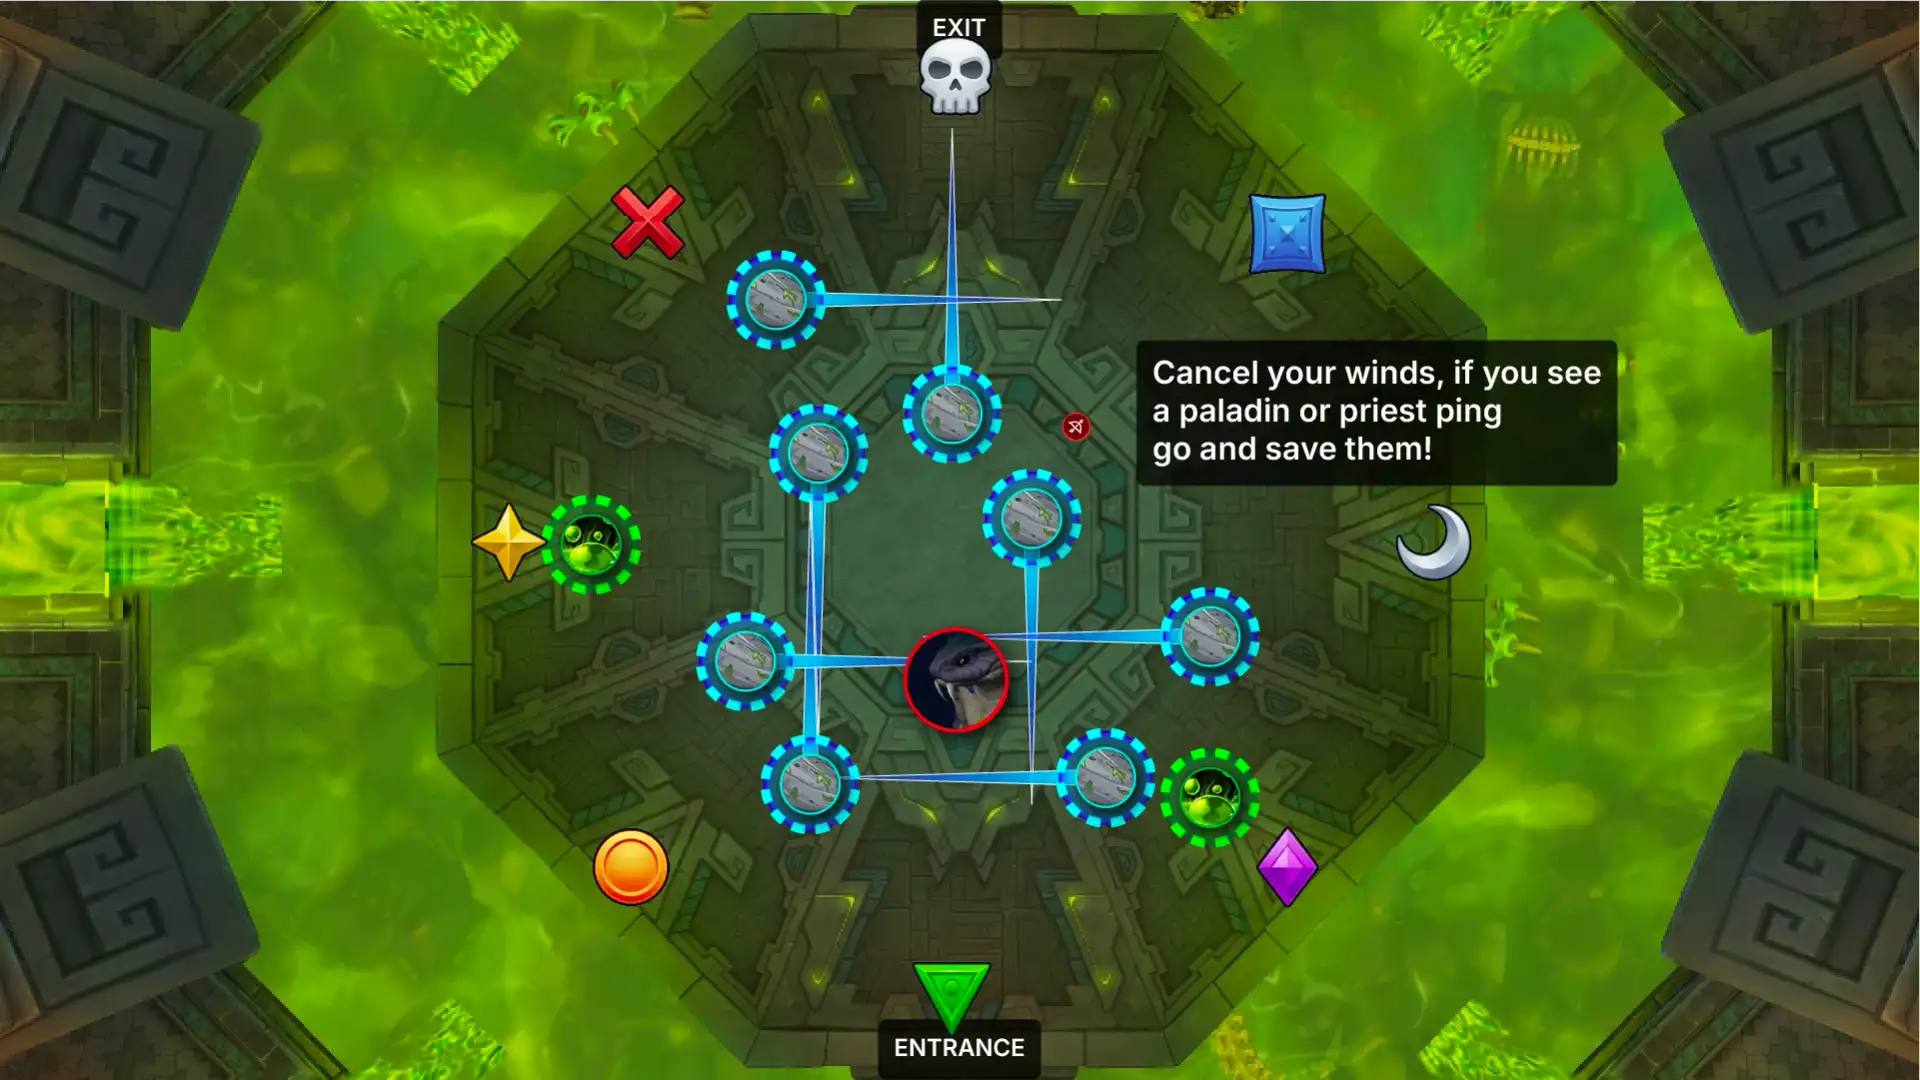
On Mythic the winds come from 4 directions, instead of Heroic's 2.
Cancel Your Winds
Most classes can cancel the winds, so don't worry about trying to hit someone.
Make sure your cancel is ready and you haven't spent it elsewhere in the fight.
Save the Priests & Paladins
Priests and Paladins will press their ping macro.
If you see one and your line can reach them, go and save them. If you are helping, you can't cancel your winds: you need to hit them with it.
Mutilate Soaks 2
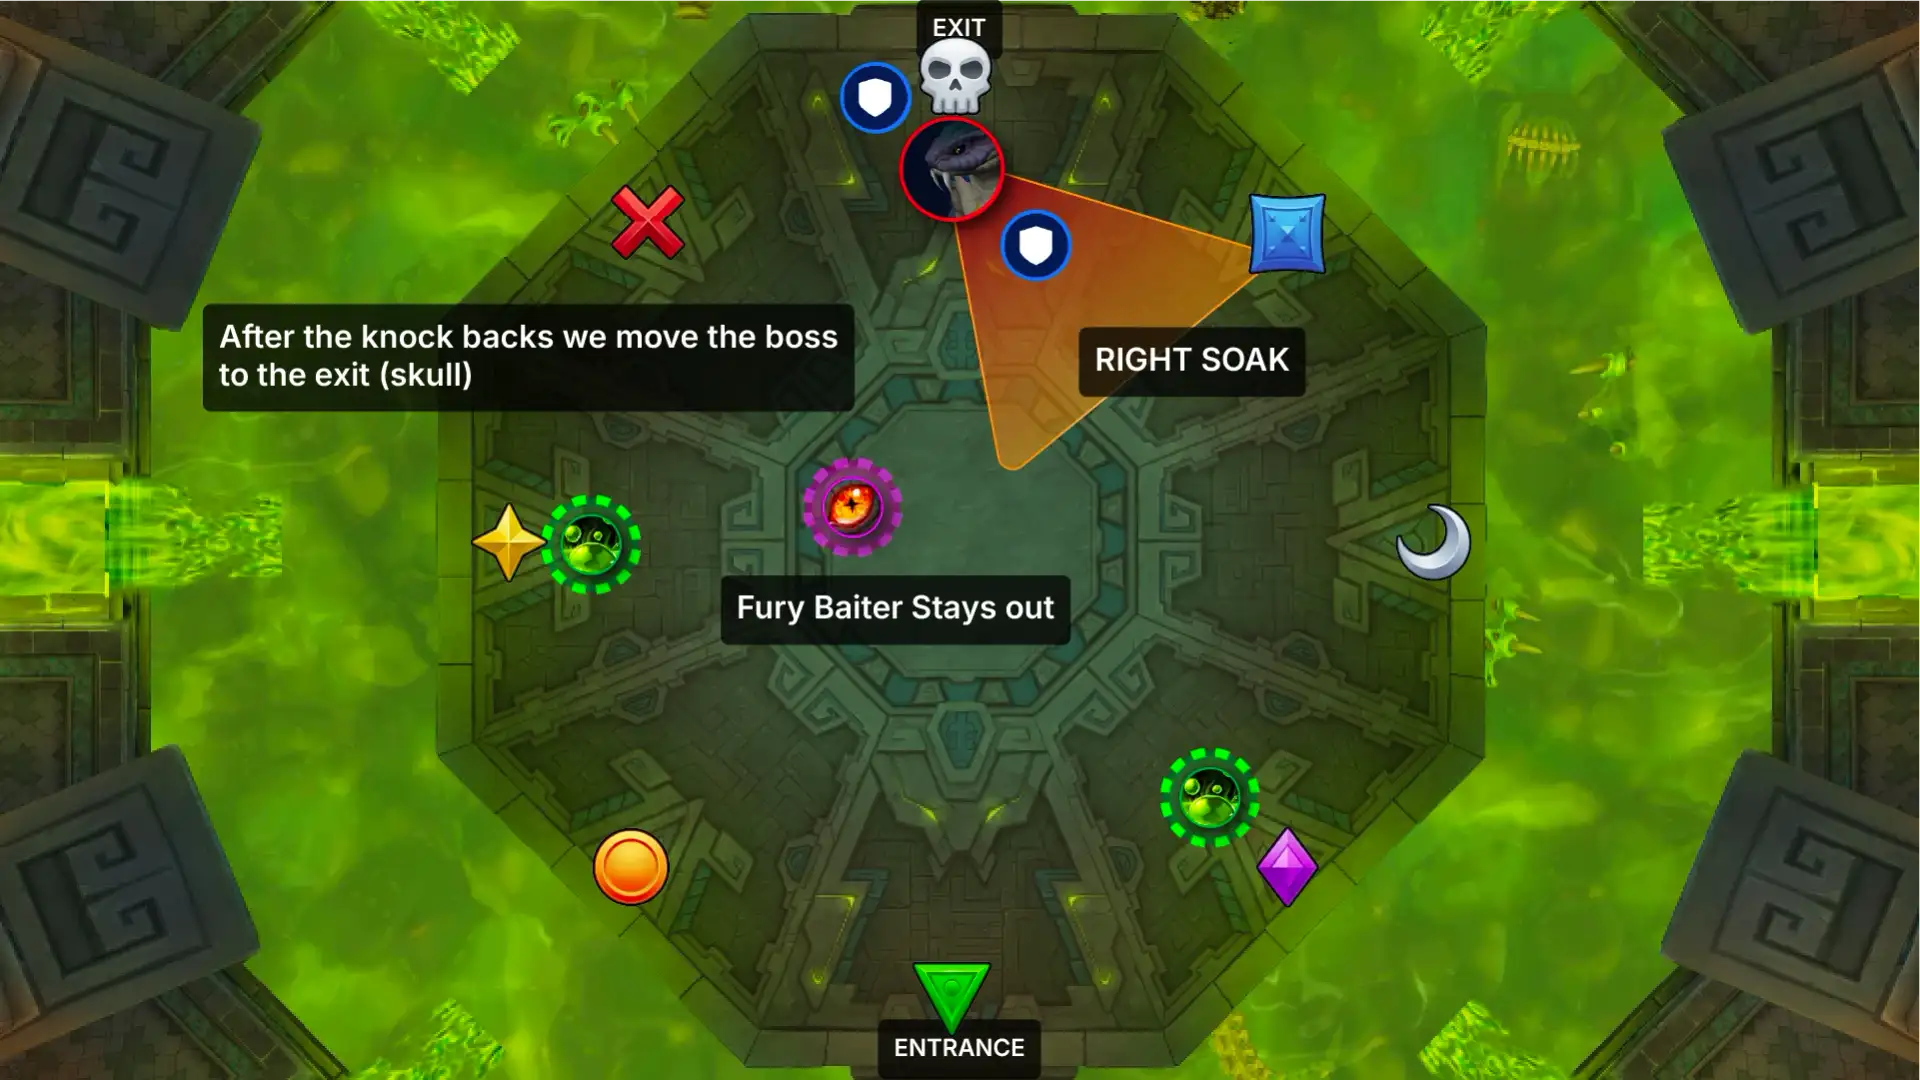
Boss to the Exit
After the knockbacks we move the boss to the exit (Skull).
Get back in your soak groups straight away.
Mutilate(opens Wowhead in a new tab)Orientation
Still facing the edge of the platform, so left and right are the same as before.
Serpent's Fury(opens Wowhead in a new tab)Fury Baiter Stays Out
Same as before: away from the raid until we call the stack.
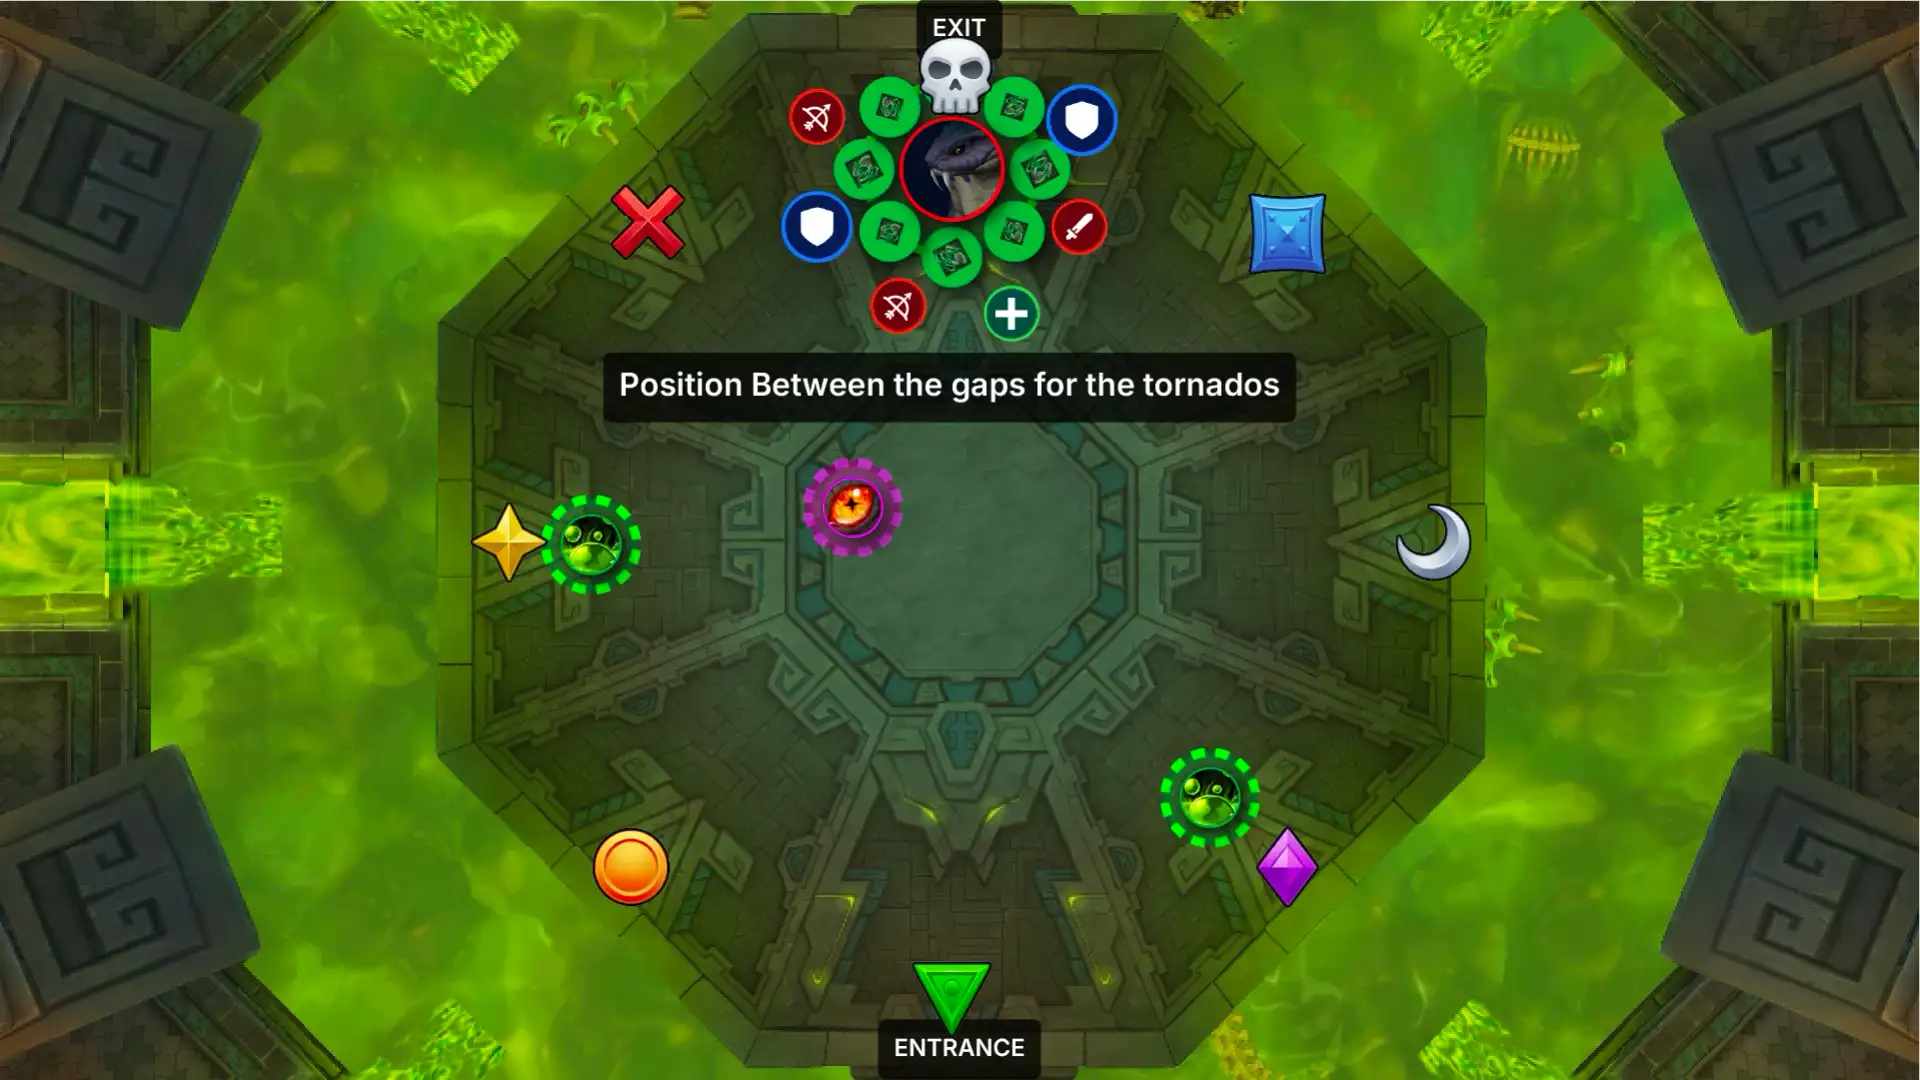
Tempest 2
Tempest(opens Wowhead in a new tab)Tornados
Same as before: position between the gaps and don't get hit.
Mutilate(opens Wowhead in a new tab)Mutilate
The next Mutilate follows shortly after. Be in your group, ready to soak.
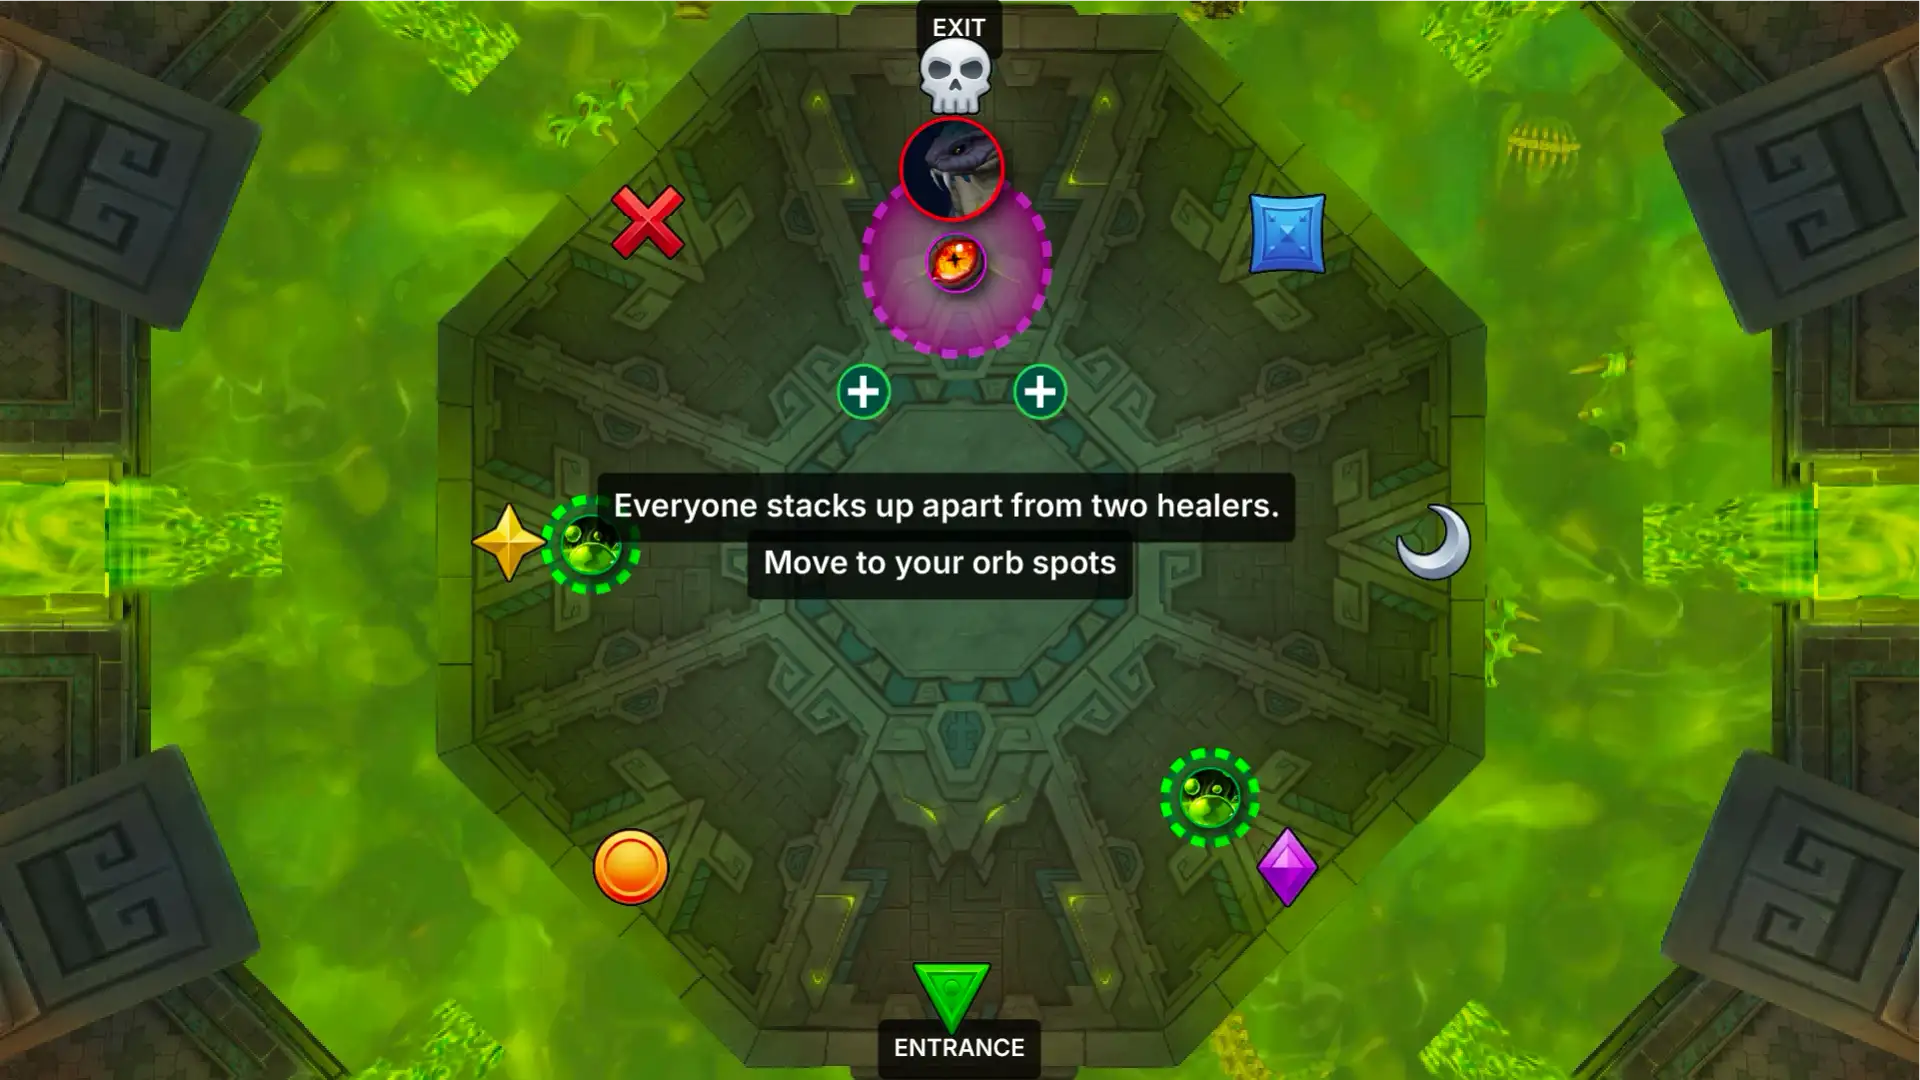
Serpent's Fury 2
Serpent's Fury(opens Wowhead in a new tab)Stack Up
Everyone stacks up apart from the two healers, tanks included.
Check whether your lines are cardinal or intercardinal and spread so they don't hit anyone.
Orb Spots
Then move to your orb spots.
Phase 2 Info
After every Dig In intermission we trigger this a little earlier than in Phase 1, so be ready to stack up sooner.
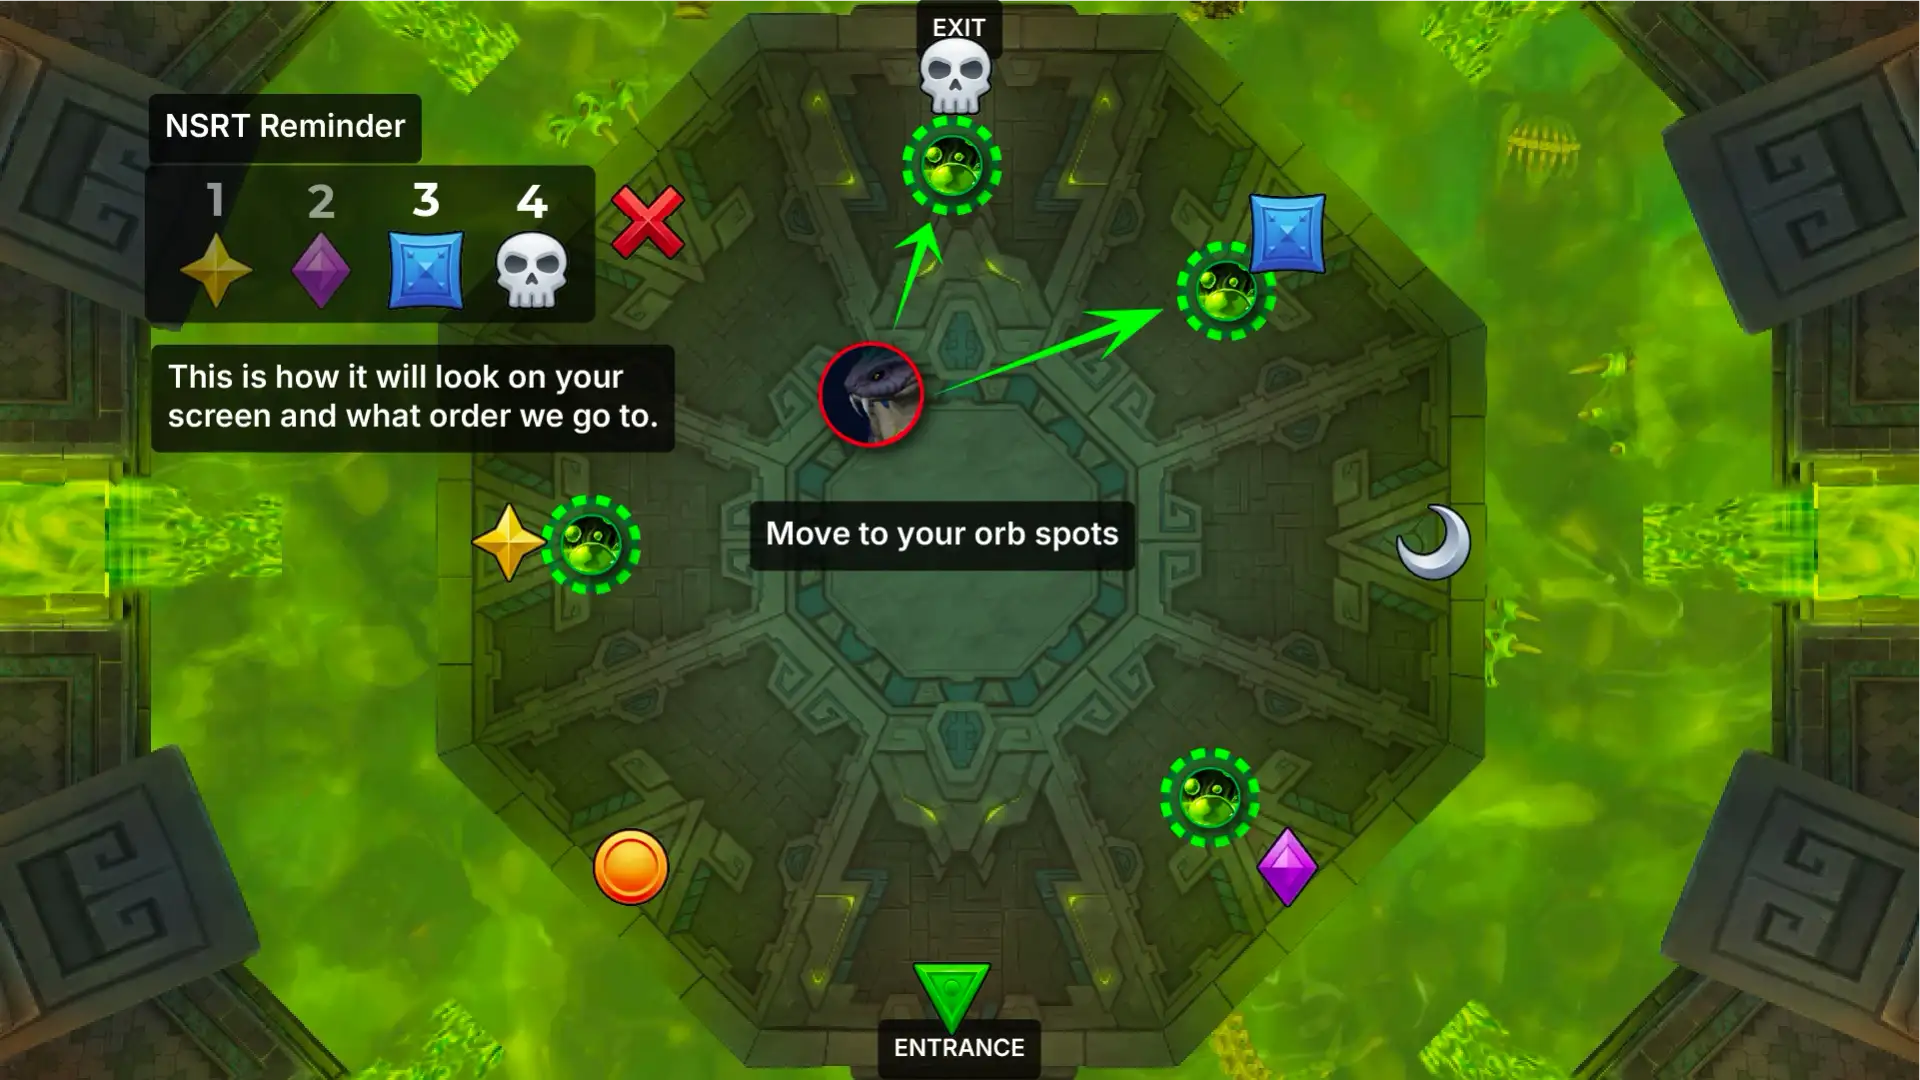
Venomous Surge 2
Venomous Surge(opens Wowhead in a new tab)Drop Order
This set takes 3 Square and 4 Skull.
Close to the edge and in line with the centre, same as before.
The 4th Orb
This one always goes at the exit.
Popping it last knocks us back to the entrance, so our positions are the same in every phase.
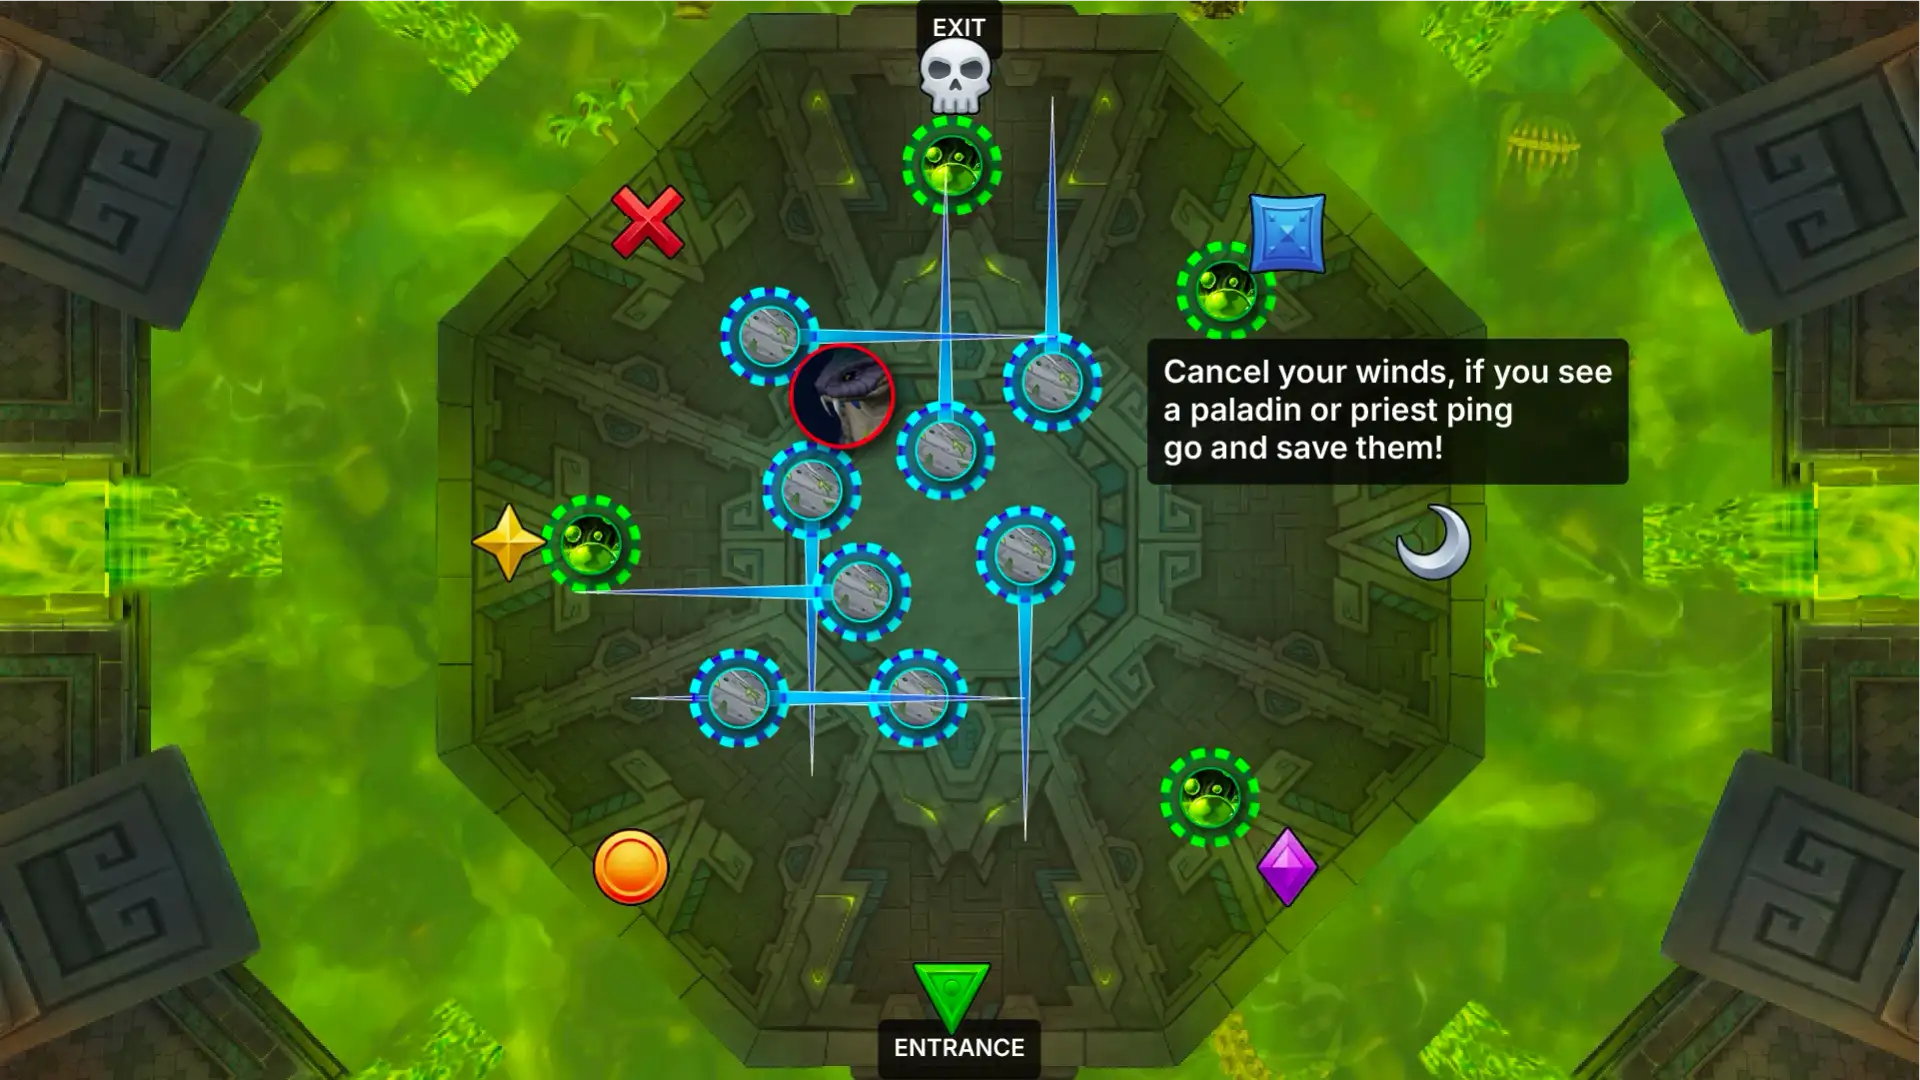
Raging Crosswinds 2
Raging Crosswinds(opens Wowhead in a new tab)Cancel or Save
Cancel your winds, or if you see a Priest or Paladin ping, go and save them.
Move for Intermission
After these winds, move to the middle of the room ready for the intermission.
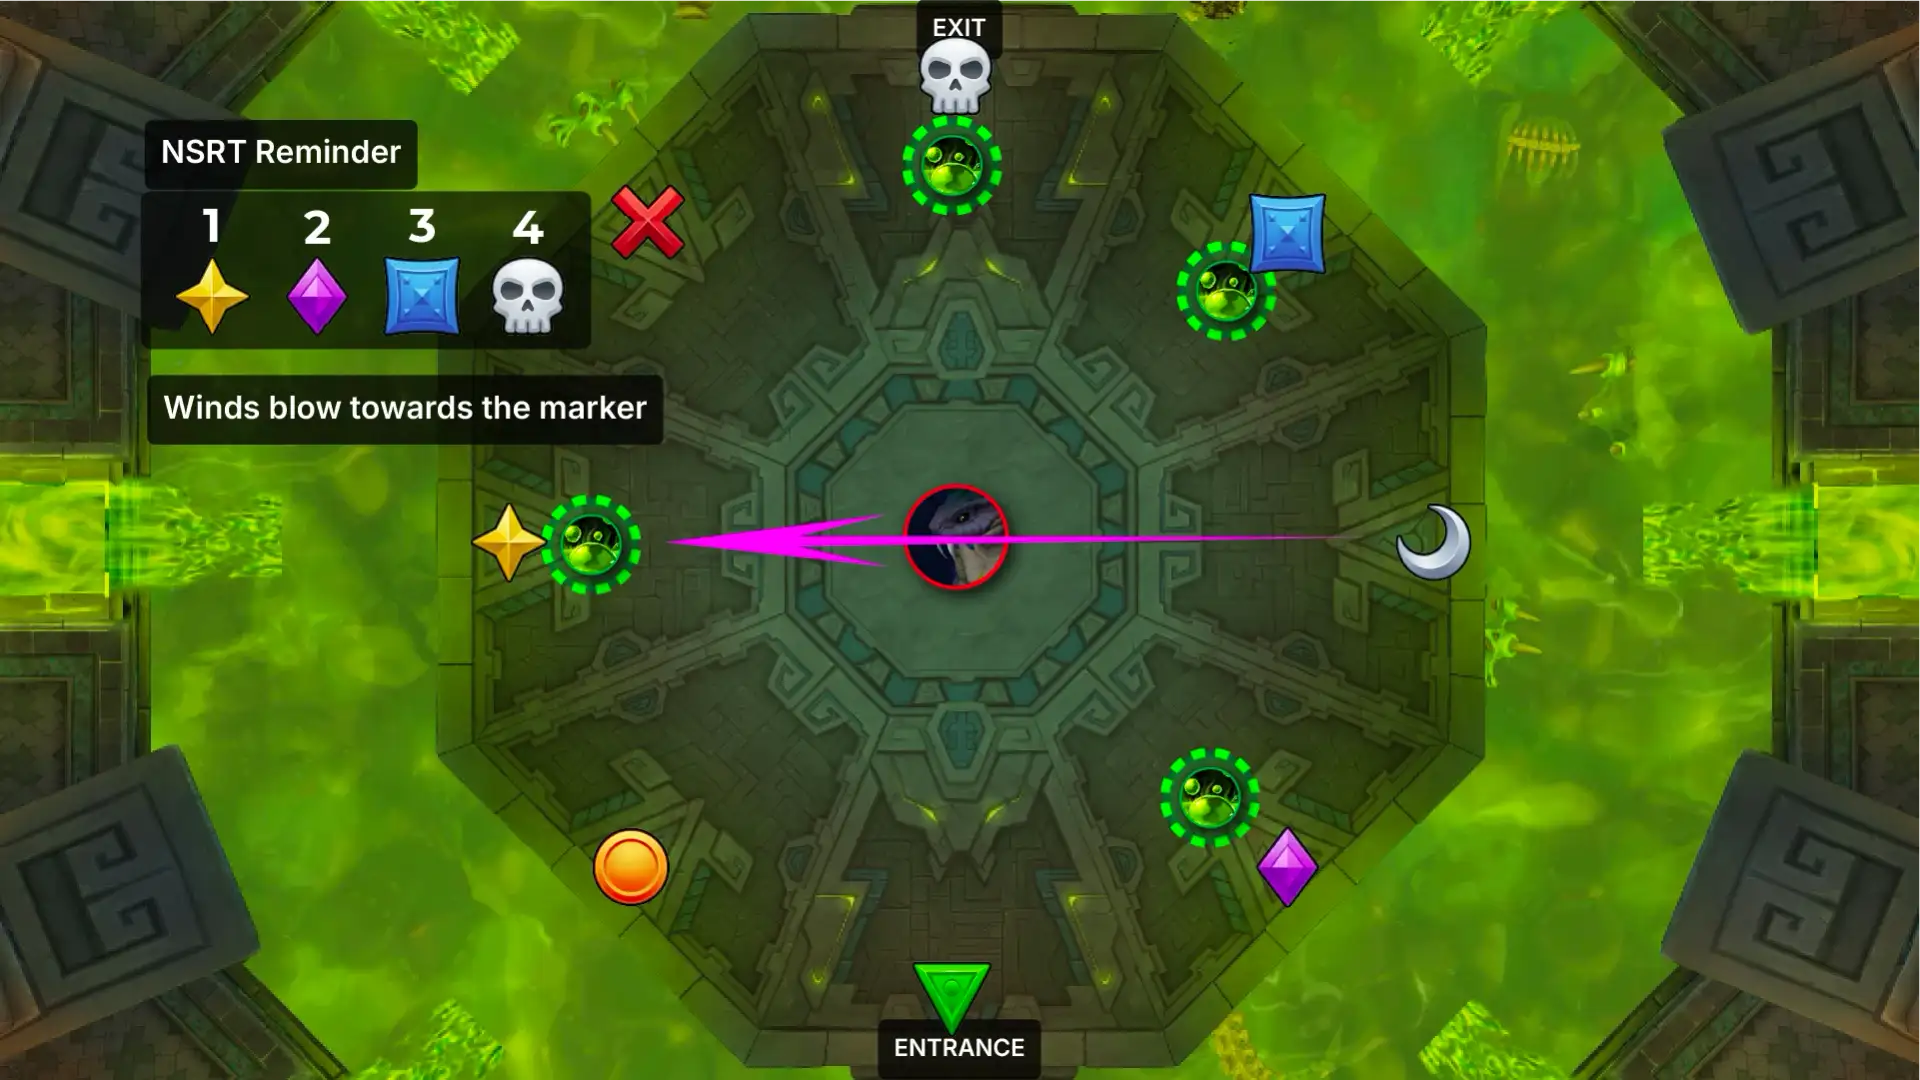
Intermission Start
 Dig In(opens Wowhead in a new tab)Winds Blow to the Marker
Each orb that pops blows us towards its marker, in the NSRT order.
Stand on the centre line of the orbs so you don't get knocked into bad spots.
After each pop, move back to the middle ready for the next one.
Damage Amp
The boss takes increased damage here.
While we are progressing, just focus on getting into position.
Orb Popper
They go out and pop the orbs for us.
Loading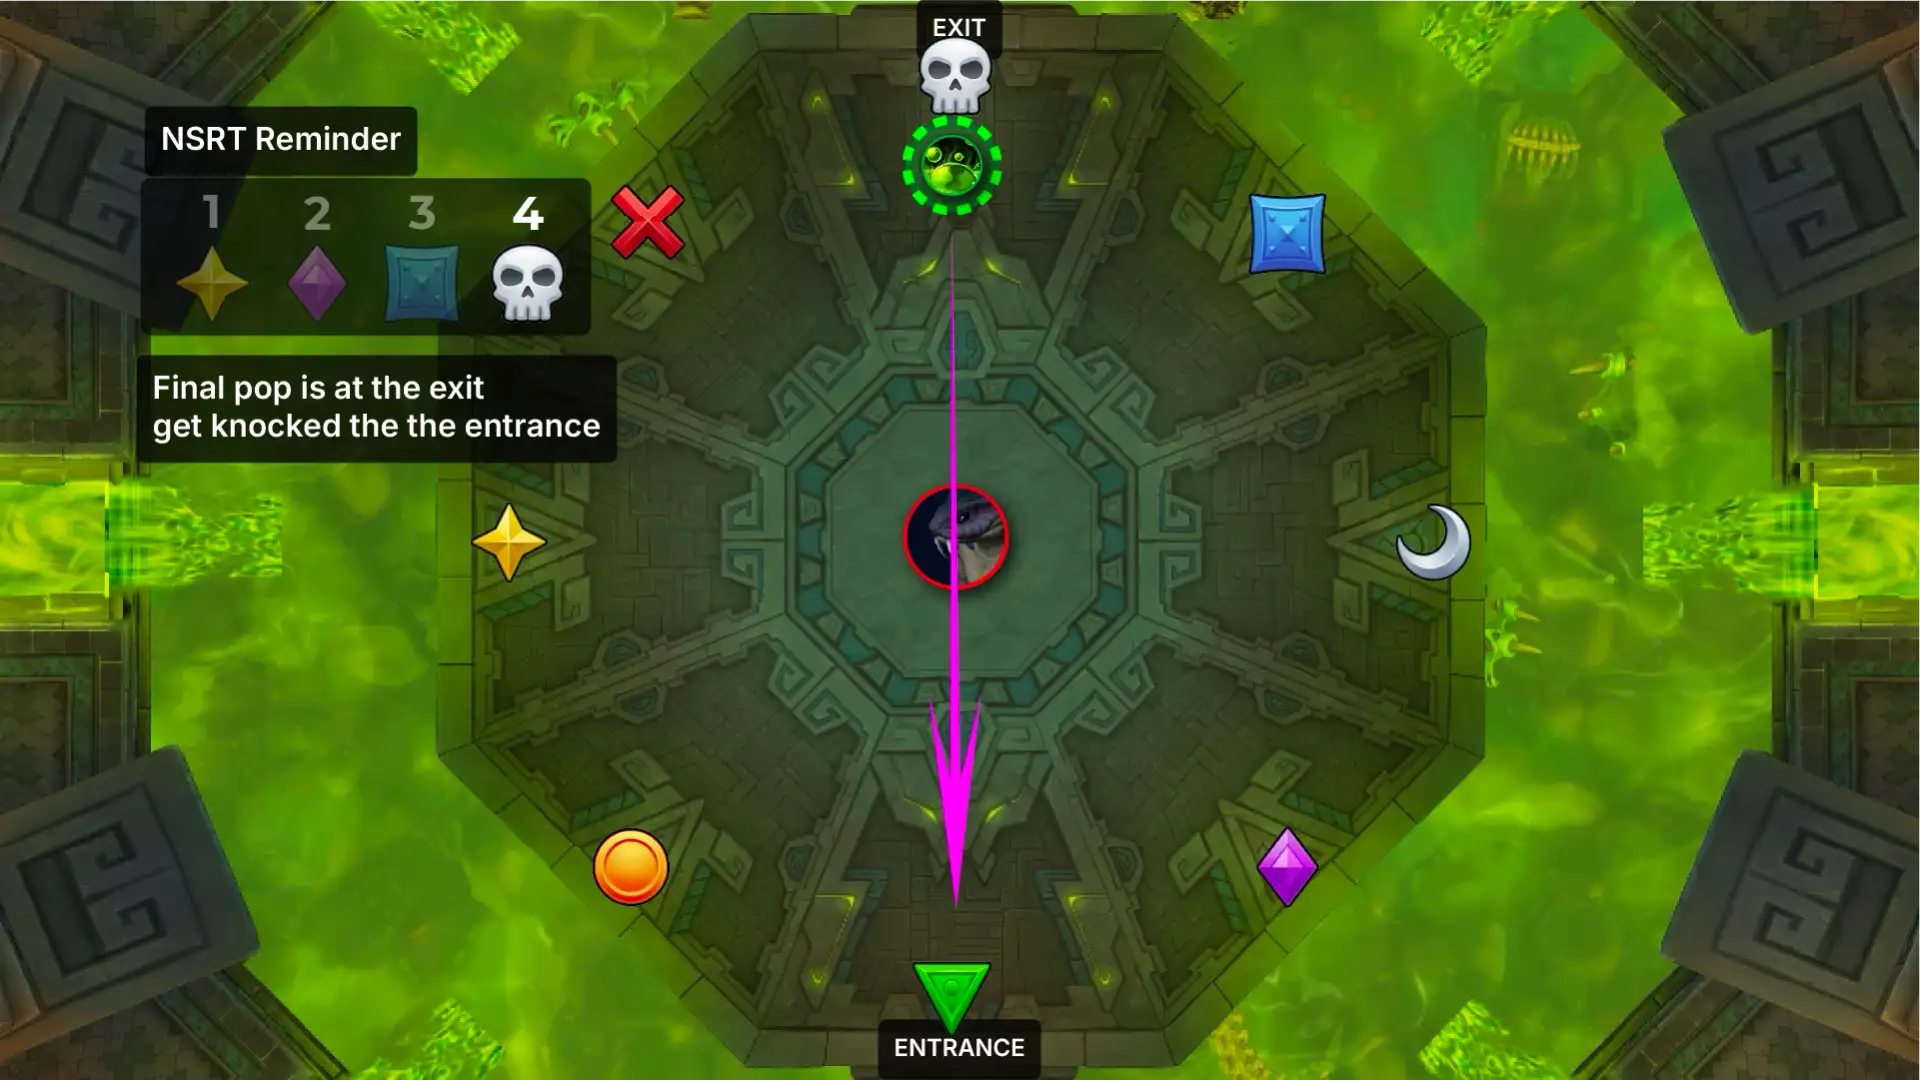
Intermission End
Final Pop
The last orb is at the exit (Skull), and it knocks us back to the entrance, the same spot we started the fight in.
Repeat the Fight
That's the whole fight. Survive one intermission and we just repeat the phases and kill the boss.
We learn everything in the first two minutes!